Web siteniz için API kullanarak kripto ödeme entegrasyonu mu planlıyorsunuz?
Bu kontrol listesi, OxaPay'in API tabanlı sistemini kullanarak kripto ödeme entegrasyonunu verimli bir şekilde uygulamayı hedefleyen işletmeler ve geliştirme ekipleri için tasarlanmıştır. İster özel bir çözüm geliştiriyor olun ister bir geliştirici ekibini yönetiyor olun, bu adım adım kılavuz, koda dalmadan tüm önemli kararları, yapılandırmaları ve operasyonel kontrolleri özetlemektedir. Hesabınızı kurmaktan ve API anahtarları oluşturmaktan doğru ödeme yöntemini seçmeye ve uygun güvenliği sağlamaya kadar, bu kontrol listesi, kripto ödemelerini güvenle başlatmanıza ve yönetmenize yardımcı olur. OxaPay.
OxaPay Hesabınızı Oluşturun ve Güvence Altına Alın
Başlamak için kripto ödemelerini kabul ediyor, İlk adım, işletmeniz veya ekibiniz için güvenli bir OxaPay hesabı oluşturmaktır. OxaPay, KYC veya KYB gerektirmeden hemen başlamanızı sağlar.
Kurulum Kontrol Listesi:
Tüccar API Anahtarınızı Oluşturun ve Yapılandırın
Kripto ödeme entegrasyonunuzu API aracılığıyla başlatmak için öncelikle bir API oluşturmanız gerekir. Tüccar API Anahtarı. Bu anahtar, ödeme sisteminizin kabul edilen paralar, markalama, fatura işleme ve daha fazlası gibi nasıl davrandığını tanımlar.
Gelişmiş Yapılandırma Seçenekleri
İşletmenizin ihtiyaç duyduğu özellikleri etkinleştirin:
Geri Arama ve Mesajlaşma Ayarları
Markalama ve Tema Ayarları

Kripto Ödeme Entegrasyon Yaklaşımınızı Seçin
Satıcı API Anahtarınız hazır olduğunda, web sitenizin kripto ödemelerini kabul etmek için OxaPay'i nasıl kullanacağına karar verme zamanı gelir. OxaPay, farklı iş ihtiyaçlarına ve teknik ortamlara uyacak şekilde birden fazla entegrasyon yolu sunar.
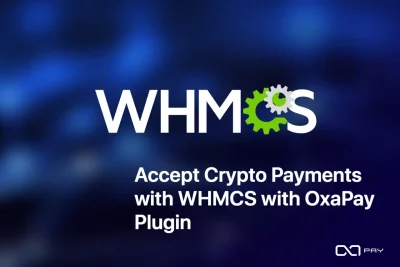
Seçenek A: Eklenti Entegrasyonu (Kodlama gerekmez)
WooCommerce, WHMCS, Blesta, ClientExec, PrestaShop ve daha fazlası gibi platformlar için en iyisidir.
🧩 Hızlı, kodsuz ve tam işlevsel bir kurulum istiyorsanız bu yöntemi kullanın.
Seçenek B: Doğrudan API Entegrasyonu (Esnek ve tam kontrol)
E-ticaret mağazaları, pazar yerleri, SaaS platformları, abonelik hizmetleri, mobil uygulamalar ve kendi ürünleri üzerinde tam kontrole ihtiyaç duyan özel web siteleri için en iyisidir kripto ödeme API'si entegrasyon.
Aşağıdakilere ihtiyaç duyan işletmeler için idealdir:
📘 Tüm teknik ayrıntılar için şuraya bakın: OxaPay API belgeleri.
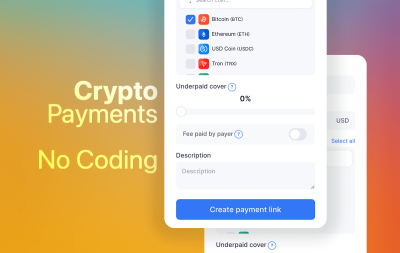
Seçenek C: Ödeme Bağlantıları (Temel kullanım için isteğe bağlı)
Tam bir kripto ödeme entegrasyonuna ihtiyacınız yoksa veya ödemeleri yerleştirmek veya herhangi bir şey geliştirmek istemiyorsanız şunları yapabilirsiniz:
Not: Bu yöntem API kullanımını gerektirmez ve otomasyon için ideal değildir.
Hangisini Seçmelisiniz?
| İşletme Türü | Önerilen Yaklaşım |
| WordPress / WHMCS / CMS | Eklenti |
| Özel Web Sitesi / Platform | Doğrudan API |
| Manuel Faturalama | Gösterge Paneli Ödeme Bağlantıları |
Yaklaşımınızı seçtikten sonra, seçtiğiniz yöntemi doğru bir şekilde uygulamak için bir sonraki adıma geçin.
Ödeme Yapınızı Seçin ve Yapılandırın
Entegrasyon yönteminizi (eklenti veya API) seçtiğinize göre, işletmeniz için en uygun ödeme yapısına karar vermeli ve ayarlarını buna göre yapılandırmalısınız. Bu adım, işlemlerin nasıl işlendiğini ve kullanıcılara nasıl sunulduğunu belirlediği için kripto ödeme entegrasyonunuzda önemli bir rol oynar.
A. Fatura Tabanlı Ödemeler (Çoğu kullanım durumu için önerilir)
En iyisi: E-ticaret mağazaları, servis sağlayıcılar, pazaryerleri ve tek seferlik ödemeler.
Her işlem için bir ödeme bağlantısı içeren güvenli ve süreli bir fatura oluşturun. Müşteriler, tutar, jeton, QR kodu ve geri sayım sayacını gösteren markalı bir OxaPay barındırmalı ödeme sayfasına yönlendirilir.
Yapılandırma Kontrol Listesi:
B. Beyaz Etiketli Ödemeler (Tamamen markalı ödemeler için)
En iyisi: Web uygulamaları, mobil uygulamalar, SaaS platformları veya kendi kullanıcı arayüzlerinde gömülü kripto ödemelerine ihtiyaç duyan platformlar.
Bu yöntem, kullanıcı deneyimi üzerinde tam kontrol sağlar. Ödeme ayrıntılarını (tutar, adres, jeton, QR kodu) API aracılığıyla alır ve kendi tasarımınızda görüntülersiniz. Arka planı ise OxaPay yönetir.
Yapılandırma Kontrol Listesi:
C. Statik Adres Ödemeleri (Tekrarlayan veya kullanıcı tabanlı modeller için)
En iyisi: Kripto para borsaları, iGaming platformları, abonelik hizmetleri ve her kullanıcının kalıcı bir adrese ihtiyaç duyduğu her durum.
Her kullanıcıya veya ürüne sabit bir kripto adresi atarsınız. Kullanıcılar istedikleri zaman ödeme yapabilir ve ödemelerini panonuz veya webhook aracılığıyla takip edebilirsiniz.
Yapılandırma Kontrol Listesi:
Yapınızı seçip yapılandırdıktan sonra akışı test etmeye ve entegrasyonunuzu etkinleştirmeye hazırsınız.
Geri Aramanızı (Webhook) Ayarlayın ve Doğrulayın
Ödeme yapılandırmanız hazır olduğunda, sisteminizin ödemeleri alabildiğinden emin olmanın zamanı geldi OxaPay'den gerçek zamanlı güncellemeler, Örneğin, bir ödeme tamamlandığında, eksik ödendiğinde, süresi dolduğunda veya onaylandığında. Bu, bir geri arama URL'si kullanılarak yapılır; bu URL, bir web kancası.
Bu Adım Neden Önemli?
Geçerli bir geri arama olmadan, platformunuz bir kullanıcının ne zaman ödeme yaptığını bilemez. Bu durum şunlara yol açabilir:
Çalışan bir geri arama, otomatik güncellemeleri ve sipariş durumu değişikliklerini sağlar.
Geri Arama Kurulum Kontrol Listesi:
Geri aramanız işlevsel hale gelip doğrulandığında, herhangi bir şeyi manuel olarak kontrol etmenize gerek kalmadan gelen ödemeler üzerinde tam görünürlüğe ve kontrole sahip olacaksınız.
Sandbox Modunu Kullanarak Tüm Ödeme Akışını Test Edin
Canlı yayına geçmeden önce, kripto ödeme entegrasyonunuzun her aşamasını güvenli bir ortamda test etmeniz önemlidir. OxaPay, gerçek kripto göndermeden gerçek ödeme davranışını simüle eden bir deneme ortamı modu sunar.
Bu, ekibinizin fatura oluşturmadan geri arama işlemlerine kadar her şeyin beklendiği gibi çalıştığını doğrulamasına yardımcı olur.
Sandbox'ta Neleri Test Edebilirsiniz?
Sandbox Test Kontrol Listesi
Tüm testler başarıyla tamamlandıktan sonra ortamınızı canlı moda geçirebilir ve gerçek kripto ödemelerini güvenle kabul etmeye başlayabilirsiniz.

Son Güvenlik Ayarlarını ve Erişim Kontrollerini Uygula
Kripto ödemeleri gerçek varlıklar içerdiğinden, kripto ödeme entegrasyonunuz erişim kontrolü, anahtar koruması ve işlem yetkilendirmesi açısından en iyi uygulamaları izlemelidir. OxaPay, entegrasyonunuzu güvence altına almak için ihtiyacınız olan tüm araçları sunar.
Güvenlik Kontrol Listesi
Güvenlik kurulumunuz tamamlandıktan sonra canlı moda geçebilir ve gerçek ödemeleri güvenle işlemeye başlayabilirsiniz.
Ödeme API Güvenliği: API Anahtarı Güvenliği için En İyi Uygulamalar
İşlemleri İzleyin ve Ödeme Performansını Analiz Edin
Sisteminiz yayına girdikten sonra, kripto ödemeleriniz üzerinde sürekli izleme ve görünürlük, operasyonel başarıyı sağlamak, sorunları belirlemek ve kullanıcıları etkili bir şekilde desteklemek için çok önemlidir.
OxaPay, her işlemi takip etmenize ve trendleri analiz etmenize yardımcı olmak için gerçek zamanlı gösterge panelleri ve filtreleme araçları sağlar.
İzleme ve Raporlama Kontrol Listesi
Doğru işlem verilerine gerçek zamanlı erişim sayesinde ekibiniz hızlı tepki verebilir, sorunları hızla çözebilir ve performansı optimize etmek için bilinçli kararlar alabilir.
Canlı Yayına Geçin ve Kripto Ödeme Entegrasyonunuzu Tamamlayın
Test, yapılandırma ve dahili onayın ardından, deneme modundan canlı moda geçmeye ve web sitenizde veya platformunuzda gerçek kripto işlemlerini işlemeye başlamaya hazırsınız.
Canlı Yayına Geçiş Kontrol Listesi
İşletmeniz yayına girdiğinde, esneklik, tam kontrol ve KYC engelleri olmadan OxaPay üzerinden kripto ödemelerini resmi olarak kabul etmeye hazır hale gelir.
Son Kripto Ödeme Entegrasyonu İncelemesi
Başarılı bir kripto ödeme entegrasyonu OxaPay API aracılığıyla ödeme yapmak, yalnızca teknik bir kurulumdan çok daha fazlasıdır; stratejik bir yükseltmedir. İşletmenize tam kontrol, gerçek zamanlı görünürlük ve KYC/KYB gecikmeleri olmadan sorunsuz ölçeklenebilirlik sağlar. Bu kontrol listesini izleyerek, platformunuzun çalışma şekline göre uyarlanmış, güvenli, özelleştirilebilir ve otomasyona uygun bir ödeme akışı sağlayabilirsiniz.
Kripto Ödeme Sisteminizi Başlatmaya Hazır mısınız?
Kripto destekli ödeme altyapınızı güvenle oluşturmaya başlayın:
🔹 Ücretsiz oluşturun OxaPay hesabı
🔹 Tümünü keşfedin API dokümantasyonu
🔹 Daha hızlı bir başlangıca mı ihtiyacınız var? ödeme eklentisi entegrasyonları
Hiçbir evrak işi, hiçbir gecikme yok; işletmeniz için yalnızca kusursuz, güvenli ve ölçeklenebilir kripto ödemeleri.